Jack Boss / The garage
How to choose a floor jack and jack stands
Capacity, clearance and support height: a practical guide to planning your Jack Boss garage setup before the first lift.
The right garage setup starts with the vehicle and the job. A jack needs enough capacity, a saddle that reaches the approved lifting point, and a useful range between its lowest and highest positions. The support stands need to fit the vehicle after it is raised. Those requirements work together; choosing the largest number on a product label leaves several important questions unanswered.
Our Jack Boss range includes floor jacks, bottle jacks and several stand designs. This guide explains how to compare those formats, what to measure before ordering and which details to confirm in the supplied manuals. It is a selection guide, not a substitute for the lifting procedure for your exact vehicle. If the correct lifting points or load requirements are unclear, get qualified help before starting.
1. Start with the job, not the product.
A seasonal wheel change, a brake inspection and a longer repair do not necessarily call for the same access. Write down what needs to leave the ground, which parts must remain accessible and where the vehicle can be supported. Then find the vehicle manufacturer’s instructions for that operation. A lifting point shown for a roadside jack may not be the complete procedure for lifting and supporting the vehicle during service.
Look for diagrams as well as written directions. Modern underbodies can include covers, battery enclosures, fuel lines and structural features that are not suitable contact points. A surface that looks solid is not permission to put a saddle beneath it. Keep the service information available while planning the purchase so that the tool choice follows the approved arrangement.
Think about the whole job sequence. The jack must approach the lifting point, raise the load, leave access for the stands and later return to transfer the load for lowering. If the jack and a stand need the same small area, you need an approved alternative arrangement, not an improvised support location. Resolve that issue before the vehicle is raised.
It is also useful to separate occasional portability from normal garage use. A tool that is comfortable to store may still be awkward to carry to another location. Check the exact product’s weight and handle arrangement when moving it matters. Do not assume that every jack of the same capacity has the same body size, material or weight.
2. Read the capacity on the actual equipment.
The rated load belongs to the exact model and its instructions. Read the manufacturer’s unit label and manual rather than choosing from a shortened product name alone. Keep the vehicle’s weight information and the lifting procedure together; do not invent a universal rule based on dividing the vehicle’s weight by two or four. The load distribution and approved lifting arrangement affect the equipment requirement.
Units deserve attention. Product descriptions sometimes use “ton” beside a pounds figure, and not every description uses the same convention consistently. A US short ton and a metric tonne are different units. If numbers disagree, do not select the more convenient conversion. Confirm the exact marked rating and the applicable manual with the seller or manufacturer before use.
“The manufacturer's rated capacity shall be legibly marked on all jacks and shall not be exceeded.”
That workplace rule expresses a useful selection principle: the rating must be readable and respected. It does not certify a particular Jack Boss model or replace the instructions supplied with it. Keep compliance claims separate from your own equipment inspection and compatibility checks.
Apply the same care to stands. Their rating convention may be expressed for a pair or in another way specified by the manufacturer. Do not add two printed capacities together and treat the result as a new rating. Use the correct matched set, with the required locking components and the adjustment limits stated in its instructions. If the pair’s label is unclear, clarify it before placing a load.
3. Measure the path to the lifting point.
Minimum saddle height tells you how low the contact surface sits when the jack is lowered. It is a useful first filter for a low vehicle, but it is not the only dimension that determines access. The front wheels, frame, lifting arm and handle connection also have to clear the approach. Measure along the route the jack will actually take.
A front bumper can be higher or lower than the approved lifting point behind it. A side skirt may obstruct the frame even if the saddle itself fits. The jack must reach its contact point without pressing against a trim panel or underbody cover. Where the manufacturer specifies an adapter, check both compatibility and the extra height it adds; do not use a loose block or homemade extension.
Reach is separate from height. A low saddle near the nose of a short jack may not reach a point located farther underneath the vehicle. Look at the dimension diagram and the lifting-arm geometry for the selected model. If the required reach is not provided, ask for it instead of inferring it from a product photograph.
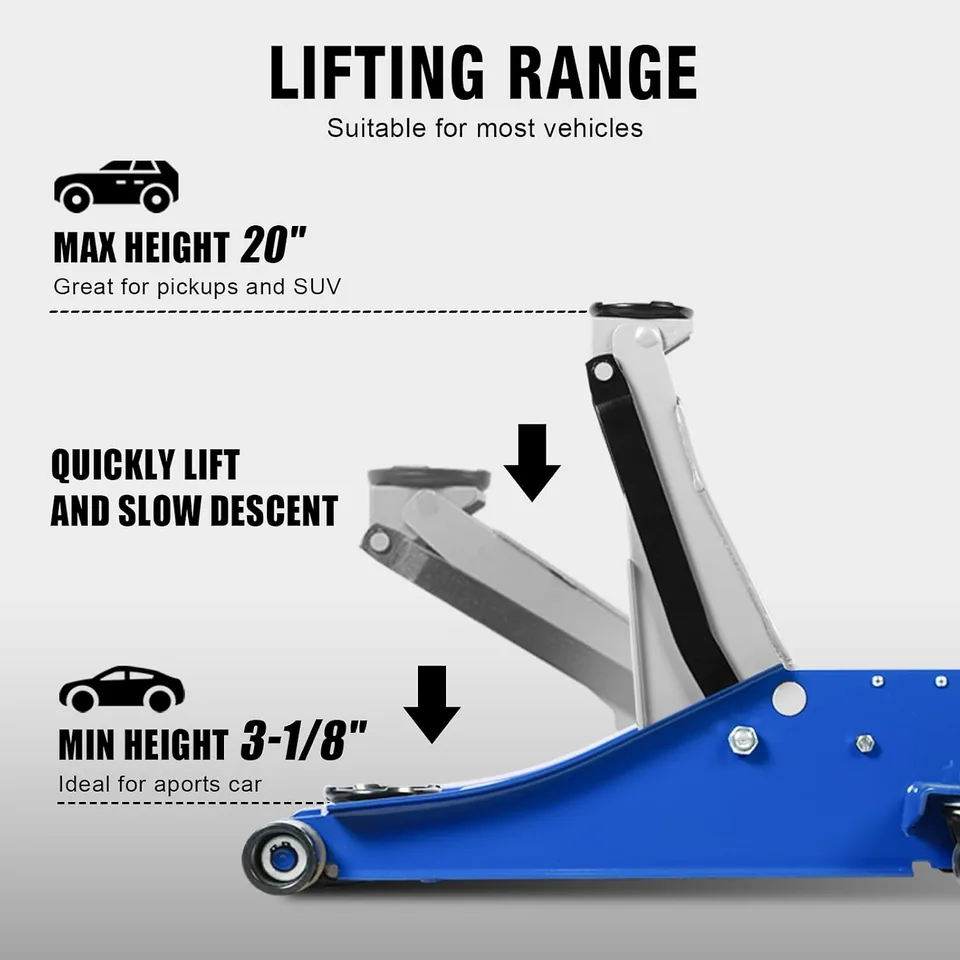
Our blue-and-gray 3 ton floor jack starts at 3⅛ inches. The selected red 4 ton model starts at approximately 3.9 inches, and the red 3 ton fast-lift model starts at 5.15 inches. Those figures help identify which models deserve a closer look. None, by itself, proves that a jack fits a particular car.
4. Compare the full lifting range.
Maximum saddle height matters when you need room to place stands and carry out the job. A jack can slide under a vehicle yet run out of travel before suitable support equipment fits. Compare the lifting range with the stand range and the vehicle’s approved support points, using the procedure for the exact operation.
The suspension is another reason that saddle movement and wheel clearance are different questions. Raising a body or frame lifting point does not translate directly into the same gap beneath a tire. Avoid estimating the required maximum height from how far you want the wheel to move. Use the vehicle procedure and obtain qualified guidance when the relationship is unclear.
| Model | Minimum saddle height | Maximum saddle height |
|---|---|---|
| 3 ton fast-lift, red | 5.15 in | 18.3 in |
| 3 ton ultra-low, blue & gray | 3⅛ in | 20 in |
| 4 ton low-profile, red | 3.9 in | 20 in |
The table compares only the selected variants in this catalog. It is not a fitment chart. Follow the current unit label and manual if the equipment has changed, and confirm missing dimensions before ordering. You can open the floor-jack comparison page to see these models together with their saved checked prices.
Pump design affects the process of raising the saddle. Dual-piston or dual-pump mechanisms can reduce the number of strokes needed during an approach, but speed is not a reason to rush the lift. Use smooth operation and check contact as instructed. Similarly, a long handle can provide useful working leverage while needing more free space behind the jack.
Consider the lowering process before you buy. You need room to operate the release control and keep clear of the load. A jack’s control design and instructions determine how that is done. Do not assume that a release mechanism works exactly like one you used on another model.
5. Choose stands as part of the same setup.
A hydraulic jack raises the vehicle. Appropriate support stands provide the support for work beneath it. Plan the stands at the same time as the jack rather than treating them as an accessory to choose later. The support point, saddle shape, base position and required height all have to work together.
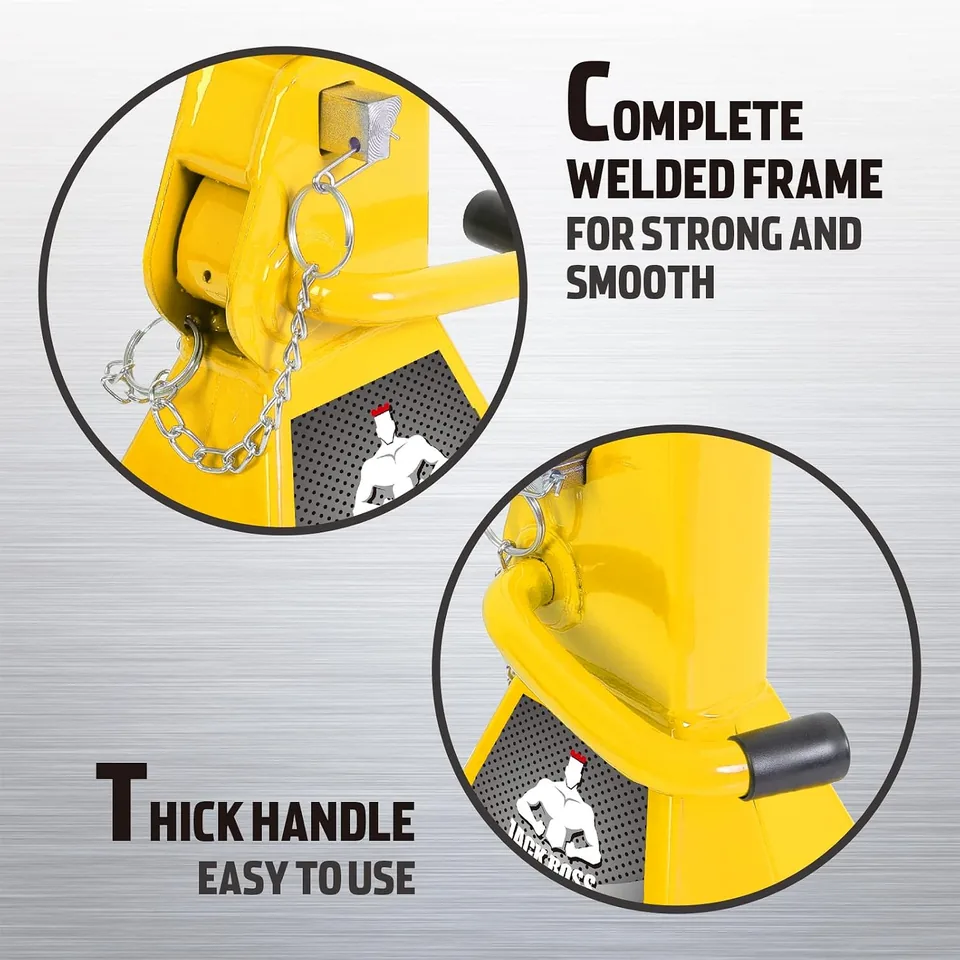
We show three different stand selections. The low-profile red pair adjusts from 9.8 to 15 inches. The standard red pair adjusts from 11.2 to 16.7 inches. The yellow double-locking pair adjusts from 11.3 to 16.8 inches and uses removable support pins in addition to the ratchet mechanism. Check the current model’s capacity convention separately from these height measurements.
| Stand selection | Support range | Locking design |
|---|---|---|
| 2 ton low-profile pair | 9.8–15 in | Ratchet |
| 3 ton standard pair | 11.2–16.7 in | Ratchet |
| 3 ton yellow pair | 11.3–16.8 in | Ratchet with support pin |
A lower stand can be useful where a support point sits close to the ground. It is not suitable when its maximum height is insufficient. A taller stand does not become a low-profile model simply by removing a component or changing the way its post engages. Use every part in the configuration specified by the manufacturer.
With ratchet stands, inspect the teeth and locking mechanism and confirm engagement as the manual directs. With an additional support pin, check the correct pin position and use all required parts. An extra locking component does not increase the marked capacity. Do not replace a missing pin with an unrelated bolt or other improvised part.
The saddle must meet an approved support point correctly. A concave saddle is a design feature, not proof of universal compatibility. If the vehicle requires a specific adapter, confirm that the adapter is approved for both the vehicle and the stand arrangement. Inspect the base, welds and post before each use, and take damaged equipment out of service.
6. Understand where other formats belong.
A bottle jack packages its hydraulic cylinder in an upright body. That shape can suit certain approved applications with sufficient starting clearance, but it does not duplicate a low-profile floor jack. Check the base, saddle, orientation limits and handle movement, as well as the load and height range. The screw extension changes the starting contact position within the limits of its manual.
Our selected bottle-jack range includes 6, 10 and 20 ton capacity markings. A larger marking is not a recommendation for structural work or a particular vehicle. Lifting a building element involves a load path, supporting structure and engineered support plan that a catalog cannot determine. Get the appropriate professional advice rather than using a general product description as a lifting plan.
Motorcycle paddock stands are a separate format with separate fit requirements. The support fittings must match the motorcycle’s approved arrangement. Measure the actual support-point spacing and check whether a rear stand or another support must already be in place before using a front configuration. Do not infer compatibility just because the description mentions the motorcycle’s manufacturer.
The Jack Boss paddock selection shown here is one stand with interchangeable fittings. It does not provide two complete stands for simultaneous front-and-rear support. That pack distinction matters when planning wheel or chain work. Read the motorcycle procedure and compare it with the exact contents before ordering.
Service tools also need an exact match. A ball-joint press kit is useful only when its cups and adapters fit the joint and the prescribed repair method. A folding lug wrench needs a fully seated socket of the correct size. These tools do not replace service information or the torque wrench needed for specified final wheel tightening.
7. Plan the workspace around the equipment.
Choose the working location before rolling the equipment into place. Follow the manual’s requirements for a hard, level surface and leave enough space for the jack to move as its lifting arm changes position. An uneven, soft or sloped surface is not corrected by choosing a higher-capacity jack. If the location does not meet the instructions, move the job to a suitable place.
Follow the vehicle procedure for transmission position, parking brake and wheel chocks. Keep people and pets out of the working area, and do not leave someone in the vehicle while lifting. Plan where removed wheels, tools and parts will go so they do not block the jack handle or the route needed to lower the vehicle.
“Jacks should never be the only support of a vehicle when someone is underneath that vehicle.”
Keep the support plan clear from the start. Do not turn a short inspection into an exception to the support requirement. If equipment shifts, settles, leaks or behaves unexpectedly, stop and follow the manuals’ procedure for resolving the condition. Do not continue because the repair is nearly finished.
Storage is part of keeping equipment ready for the next use. Dry the tools, put loose fittings together and protect labels from damage. Keep the exact manual with the model or in a clearly identified file. A portable toolbox or parts organizer can help separate adapters and small hardware, but do not treat a storage box as a step or support.
Inspect equipment after an unusual load, drop or impact, as well as at the intervals required by its manual. Cosmetic condition alone is not proof of serviceability. If a label is unreadable or a load-bearing part is suspect, obtain the correct replacement information or remove the equipment from use.
Keep a short equipment record.
After choosing a model, save its product name, capacity marking and the manual supplied with that exact unit. Photograph the identification label while it is clean and readable, and keep that image with your order information. This makes it easier to ask a precise question about a replacement handle, locking component or maintenance instruction later.
Keep different model instructions separate. A manual for a similar-looking jack may use a different release procedure, fluid specification or inspection schedule. If you buy another stand pair later, do not mix posts or locking parts merely because they appear to fit. Treat the supplied equipment as an identified set and ask the manufacturer about any proposed replacement.
Think about where that information will be available during the job. A printed copy or a saved manual that can be opened without searching is more useful than a link buried in an old message. Put the equipment reference beside the vehicle service information before starting, then check both when a question arises.
Recheck the plan when the vehicle changes.
A setup chosen for one car should not automatically carry over to another. A different vehicle can change the required capacity, approach clearance, lifting-point shape and support height even when both vehicles are described as sedans or SUVs. Repeat the measurements and review the new vehicle’s procedure. The same applies after changes that affect ride height or underbody access. Keep the choice tied to the current vehicle and operation, rather than to a remembered category or a previous successful lift.
8. Make the final check before ordering.
Open the exact model page and compare the chosen variant with your notes. Product families can contain different heights, colors, pump designs and pack quantities. A similar photograph or shared capacity number does not establish that two offers contain the same equipment.
- Confirm the vehicle’s approved lifting and support procedure.
- Check the exact load rating and unit convention.
- Measure the approach, reach and required height range.
- Check the support-stand range and required locking parts.
- Confirm the selected model, finish and quantity.
- Review included adapters, handles, fittings and documentation.
- Check storage space and carrying needs.
- Confirm the final price, delivery and return terms in the purchase tab.
Our prices are saved checked amounts, so the final offer may differ when you open it. Review the selected option again before placing the order. For questions about missing measurements or included parts, use the seller’s available contact option before buying rather than filling a gap with an assumption.
When the equipment arrives, compare the contents with the manual and inspect the unit before use. If something is damaged or missing, keep it out of service while you contact the seller through the order. Start with the pre-use checklist, keep the instructions nearby and give the setup the same attention as the repair itself.